
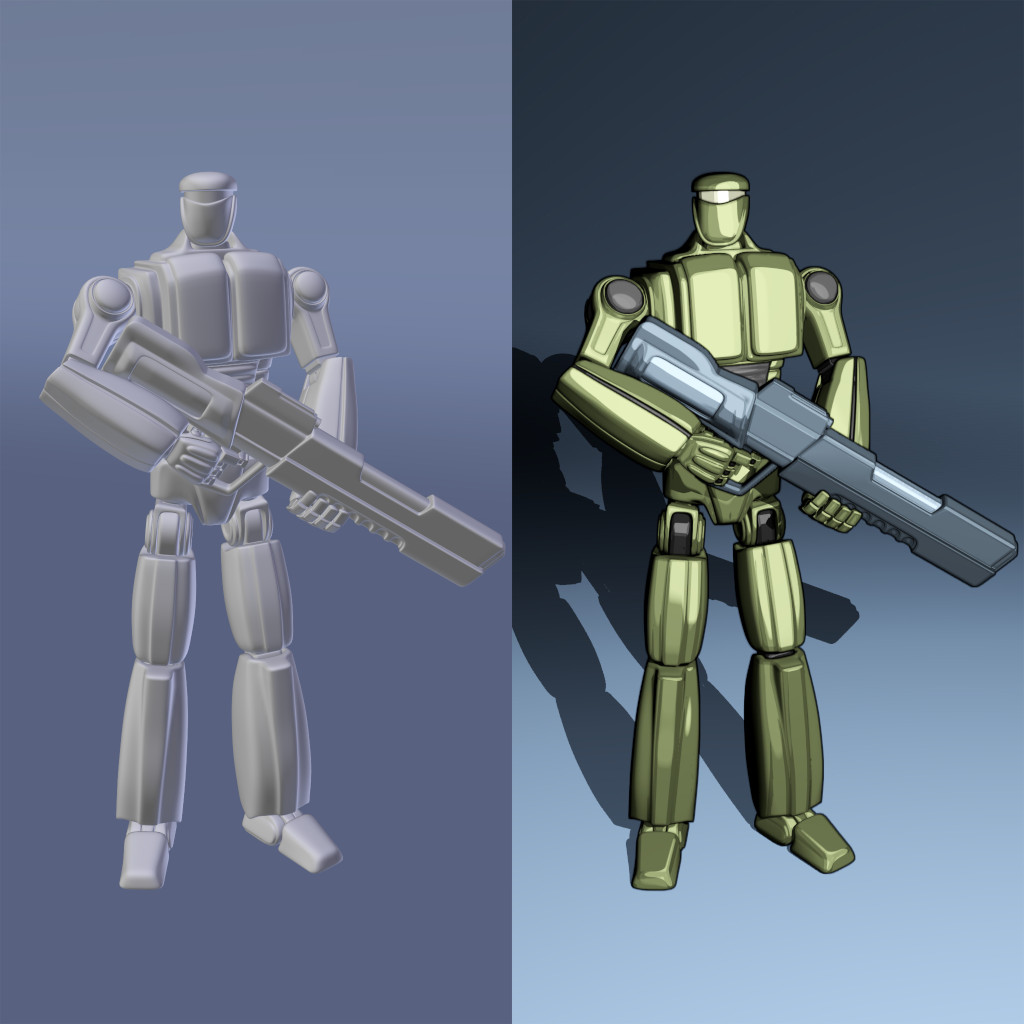
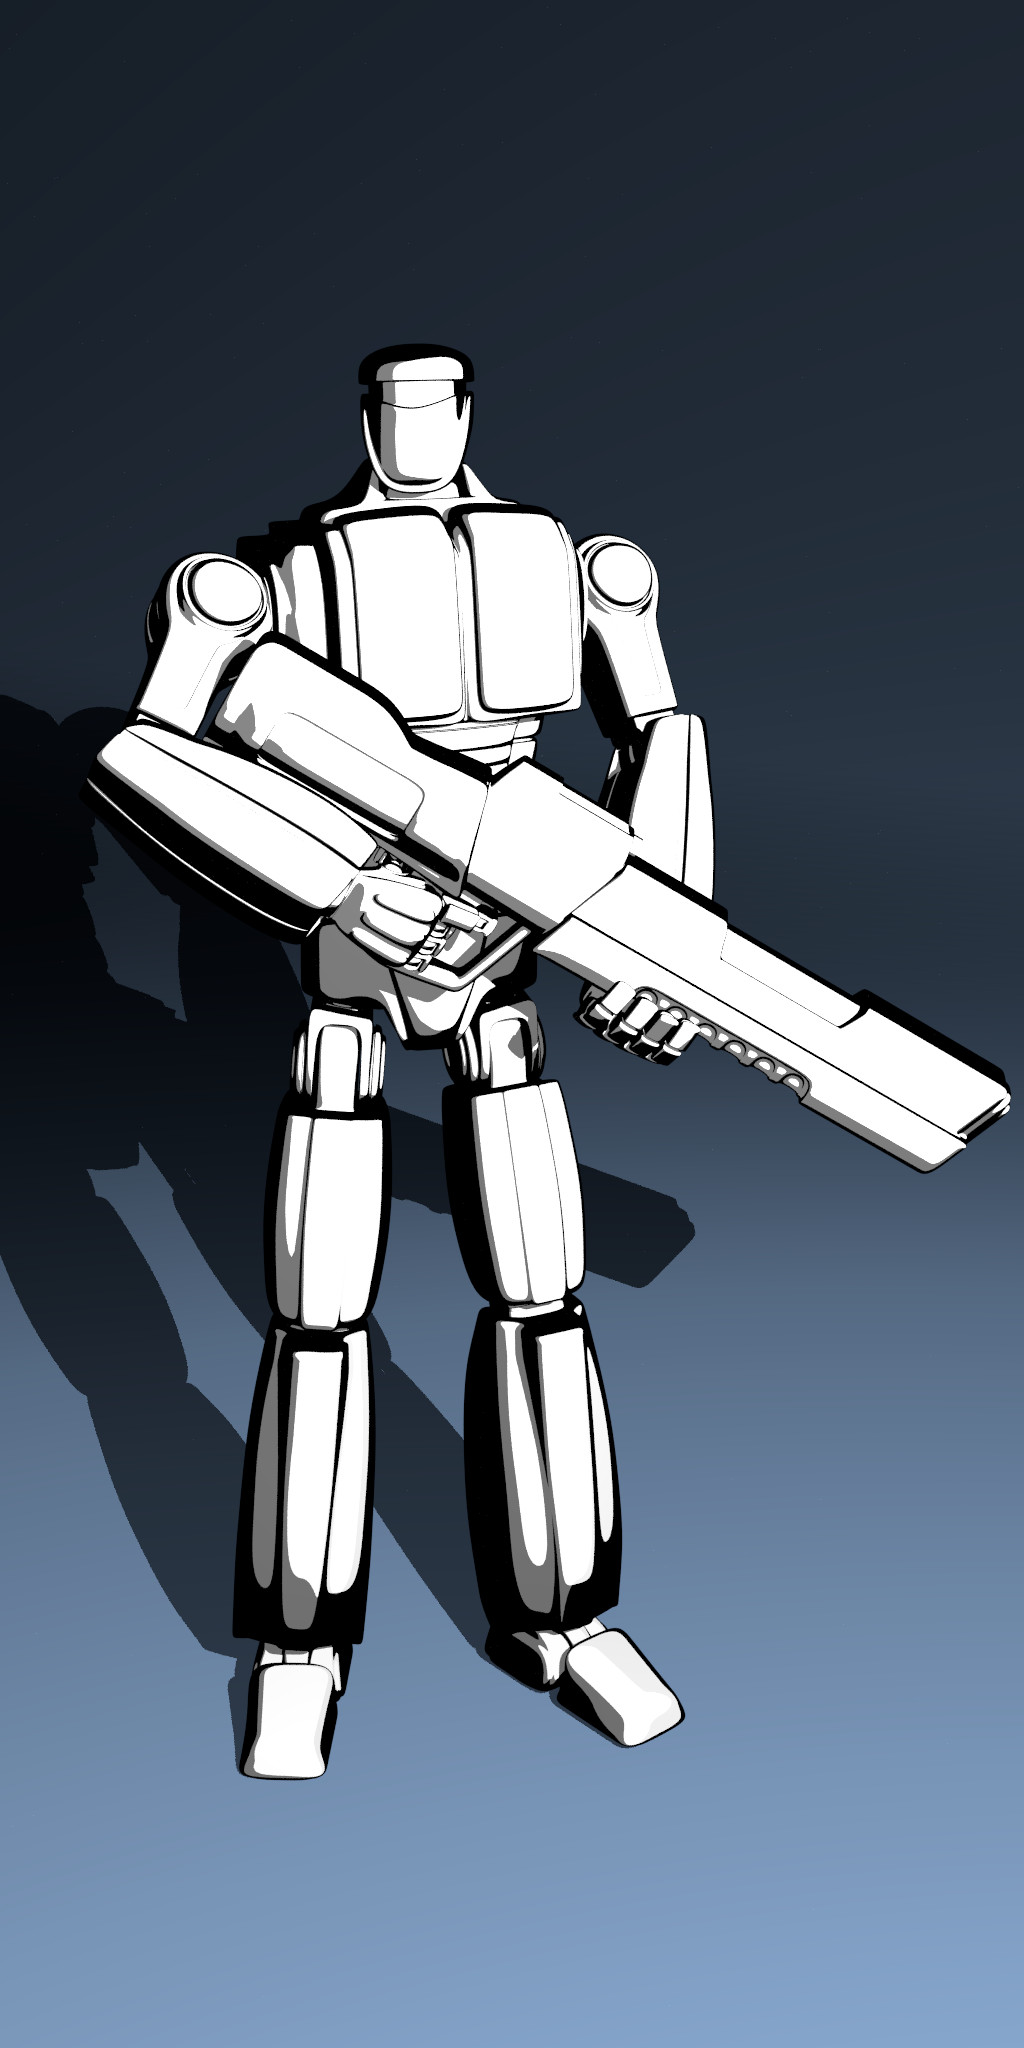
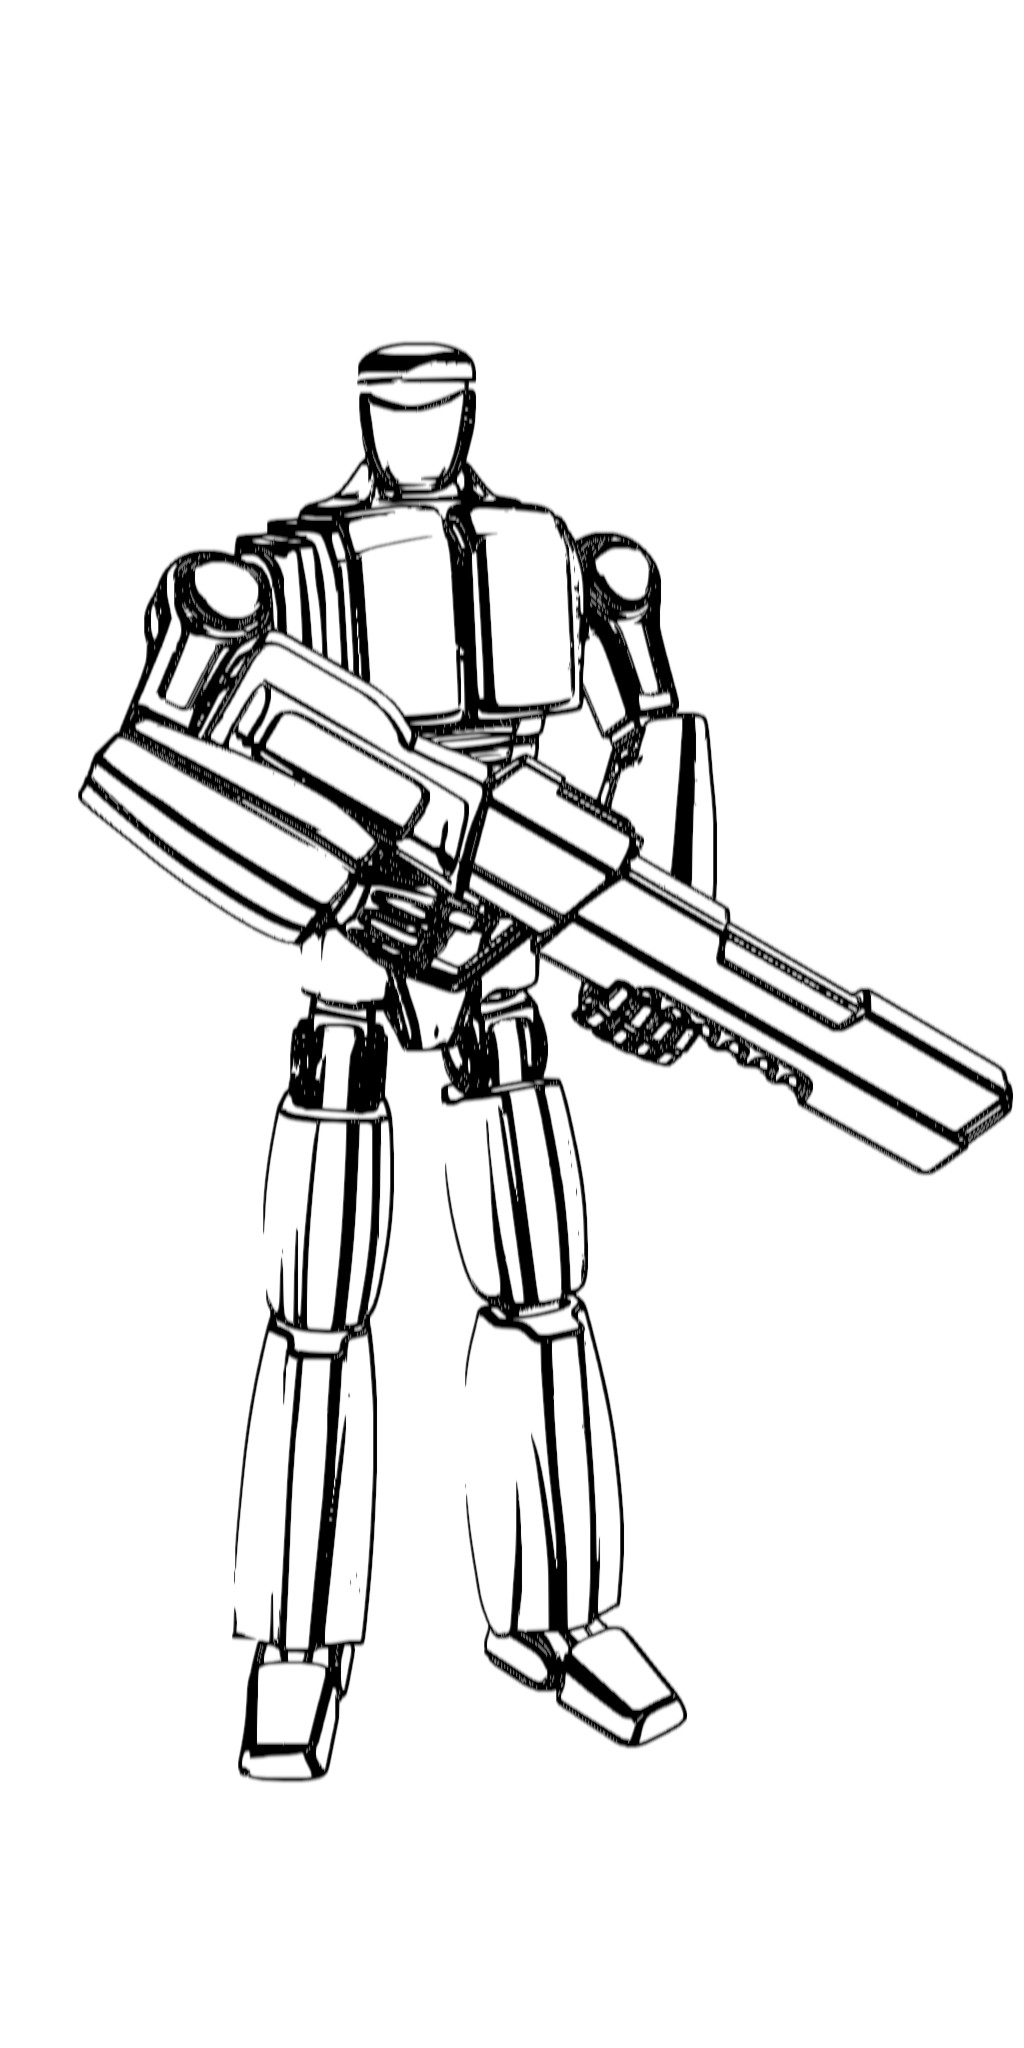
[:en]One of the most recent additions to Cycles render engine has been a toon shader. Many people seem to be interested in using it, but aside from the links shown here, there is little to no information about it, so they must resort to personal experimentation. This tutorial aims to teach readers how to use this toon shader to create renders with a comic style, and will be based on this simple scene as an example:
We will break up this tutorial in four different sections:
- Lighting setup
- Shading
- Render parameters
- Compositing
Lighting setup:
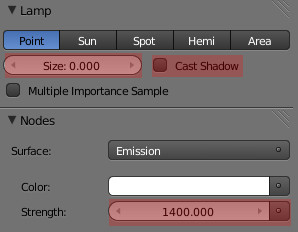
The first step will be setting up our lighting, which will be basically a key light and a fill light. Both lights will be point lights with 0 size. Any light with a size different to zero will create gradients in our shading. We want shading to be as flat as possible, since we will manually create and control gradients in our objects and characters using ‘size’ and ‘smooth’ parameters in the toon shader.
Key Light: we will use a point lamp, placed slightly above and to the right of our character and set to a very high ‘strength’ value. This will be our main light, the one that will define shading direction and the only one casting shadows in our scene. The high ‘strengh’ value shown here is needed to light a model that is 10 blender units high. Smaller objects will need much lower values.

Key light location
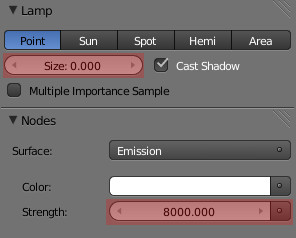
Key light settings
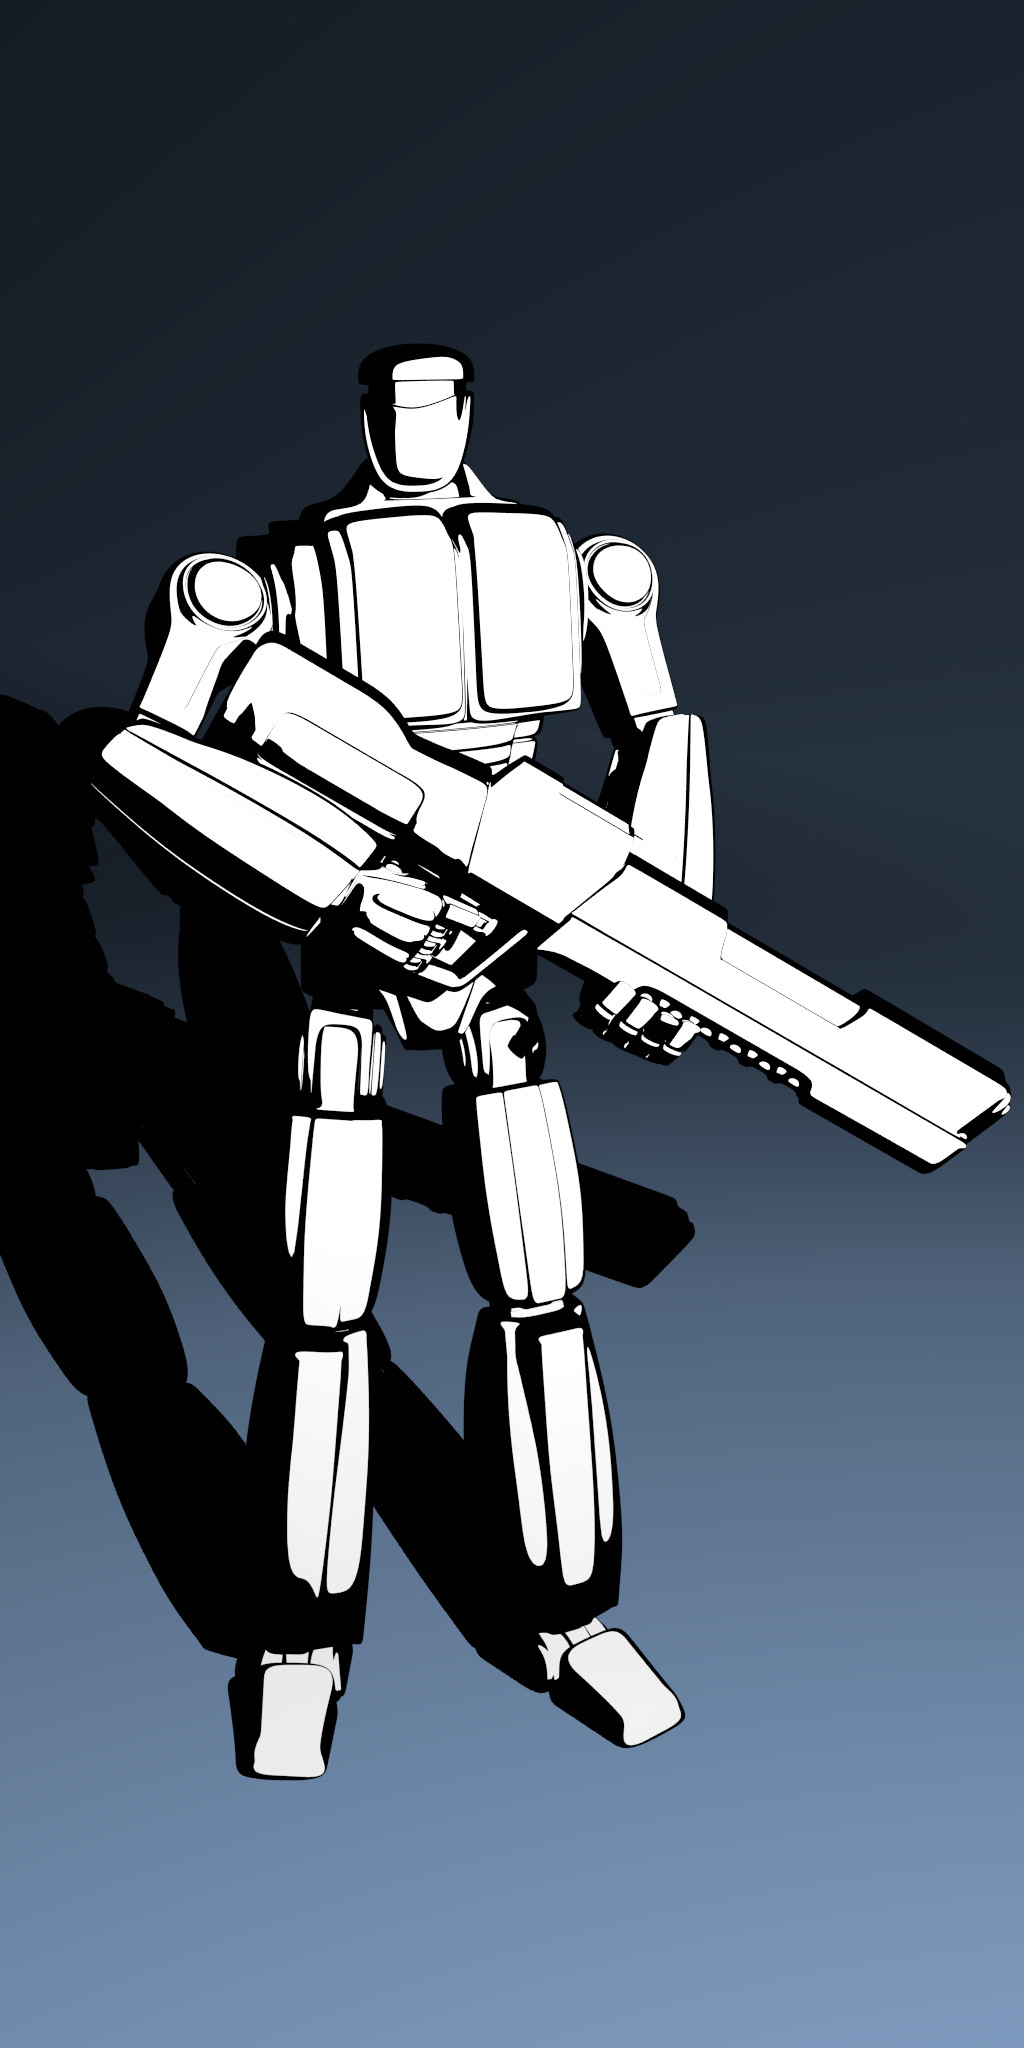
Scene lighted by key light
Fill Light: we will use a point lamp parented to the camera, and with ‘cast shadow’ disabled so it won’t create a second shadow under objects and characters. This light is there to fill the dark side of objects, so they won’t be pitch black. It will also create additional highlights and details in our objects. Again, seemingly excessive ‘strengh’ value is due to the size of the lighted model. Smaller objects will require more ordinary values.
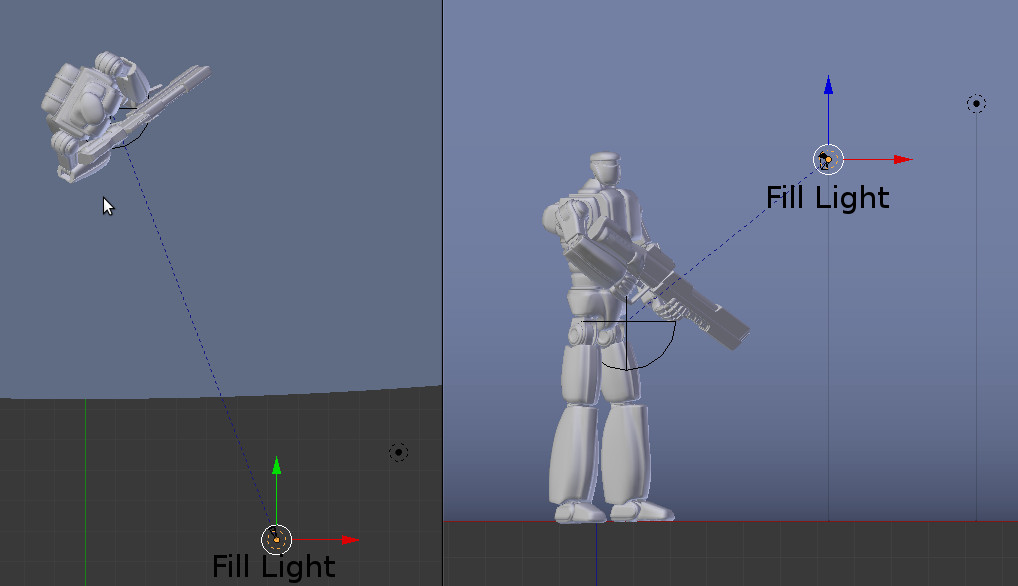
Fill light location
Fill light settings
Scene lighted by key and fill lights
World Background: usually our background will be absolute black, but if you are willing to experiment a little with it, you can raise it to a 25% gray. It can help to fill shadow, but can also introduce some noise, which will require higher sampling to clear up, and that means longer render times. For this particular scene we won’t use background lighting.
Shading:
In this stage we will setup the materials defining our model’s appearance. We are going to use toon shader for all our materials here, so some advice about its behavior is in order.
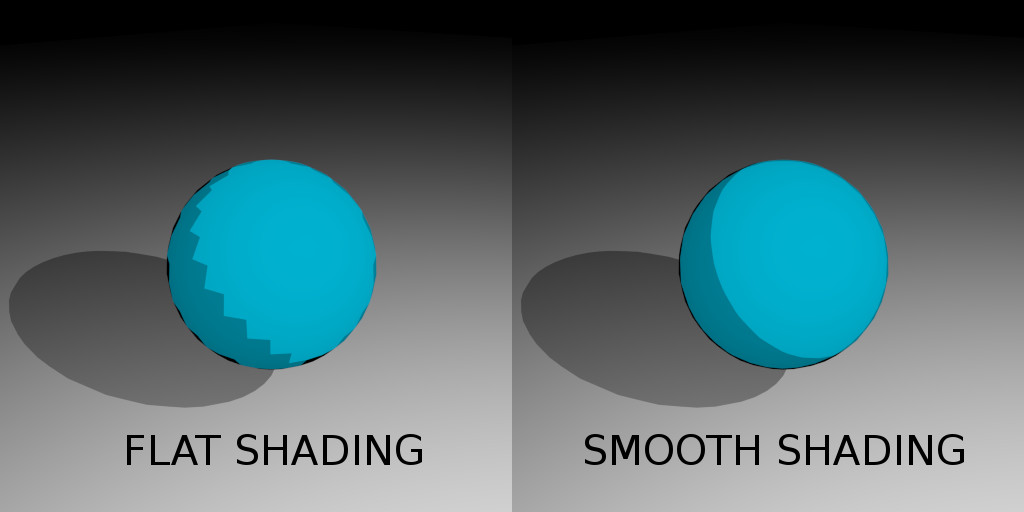
First of all, you should always use the toon shader with smooth shading activated, otherwise you will get some nasty artifacts.
Another thing to be aware of when working with the toon shader is that certain combinations of ‘size’ and ‘smooth’ settings in the shader will produce very visible terminator artifacts on low poly objects.
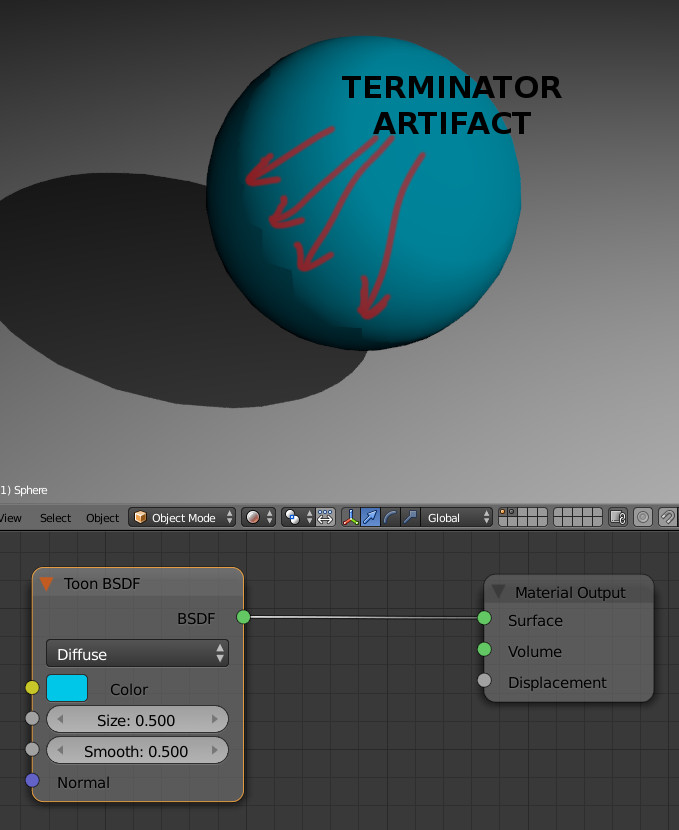
The toon shader can work in diffuse mode and glossy mode, and a combination causing artifacts in one mode might not cause them in the other mode. After some experimenting I found that following these two rules for diffuse and glossy mode respectively, you can avoid terminator artifacts:
- Diffuse mode: size+smooth <= 0.9
- Glossy mode: size+smooth <= 1.0
As long as you don’t set the added values of size and smooth above 0.9 in diffuse mode or 1.0 in glossy mode, you will be safe from the terminator artifacts in the toon shader.
We will now examine the node setup for the main material in our robot. We will begin by setting our base diffuse shader. ‘Size’ will let us define the proportion between lighted and shadow areas in the object. On the other hand, ‘smooth’ will allow us to define the width of the terminator area, which is the border region that separates light and shadow areas in an object. The diffuse component in our material will have a 0.6 size, assigning lighted surface to a majority of the model, and 0.2 smooth, giving it a nice transition into shadow.
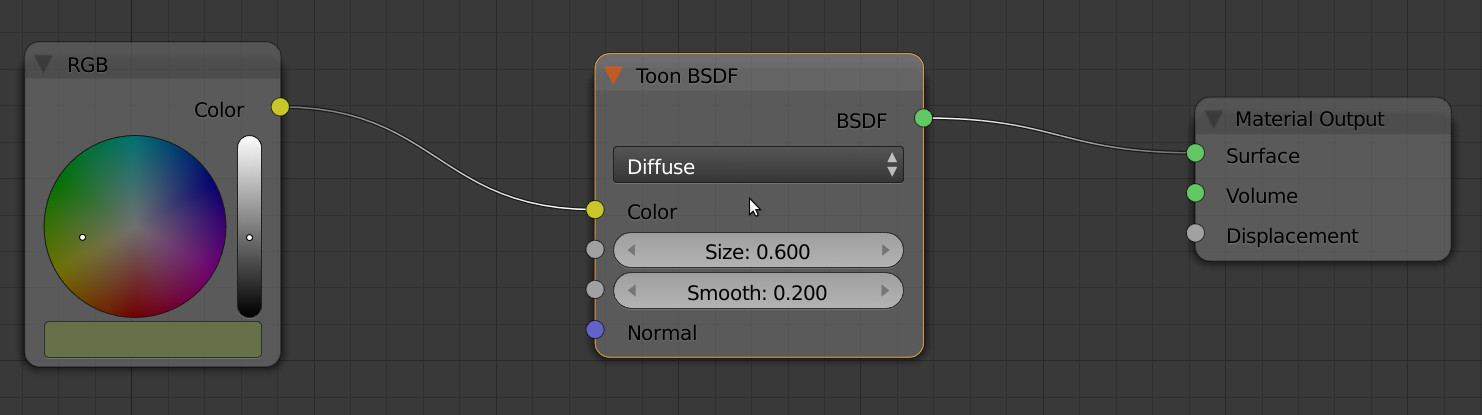
Material node setup – Step 1
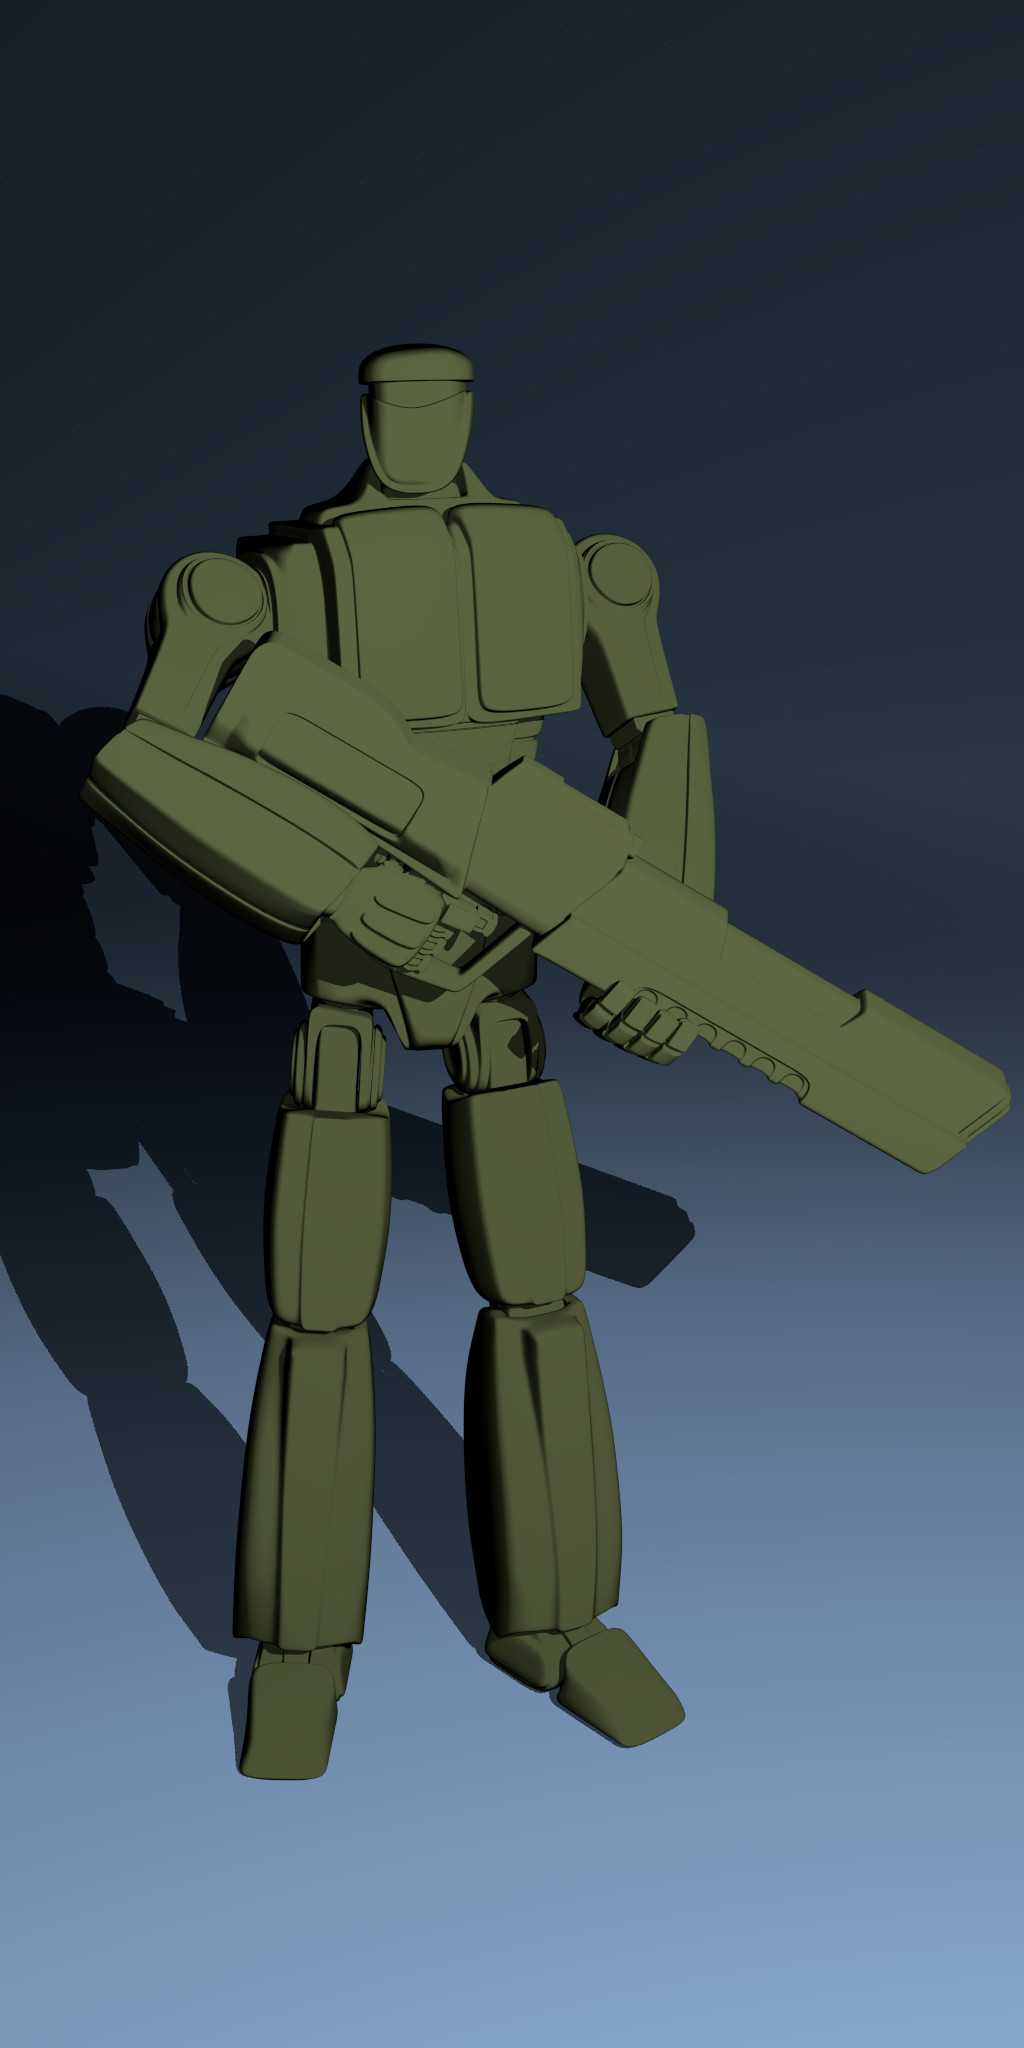
Material appearance – Step 1
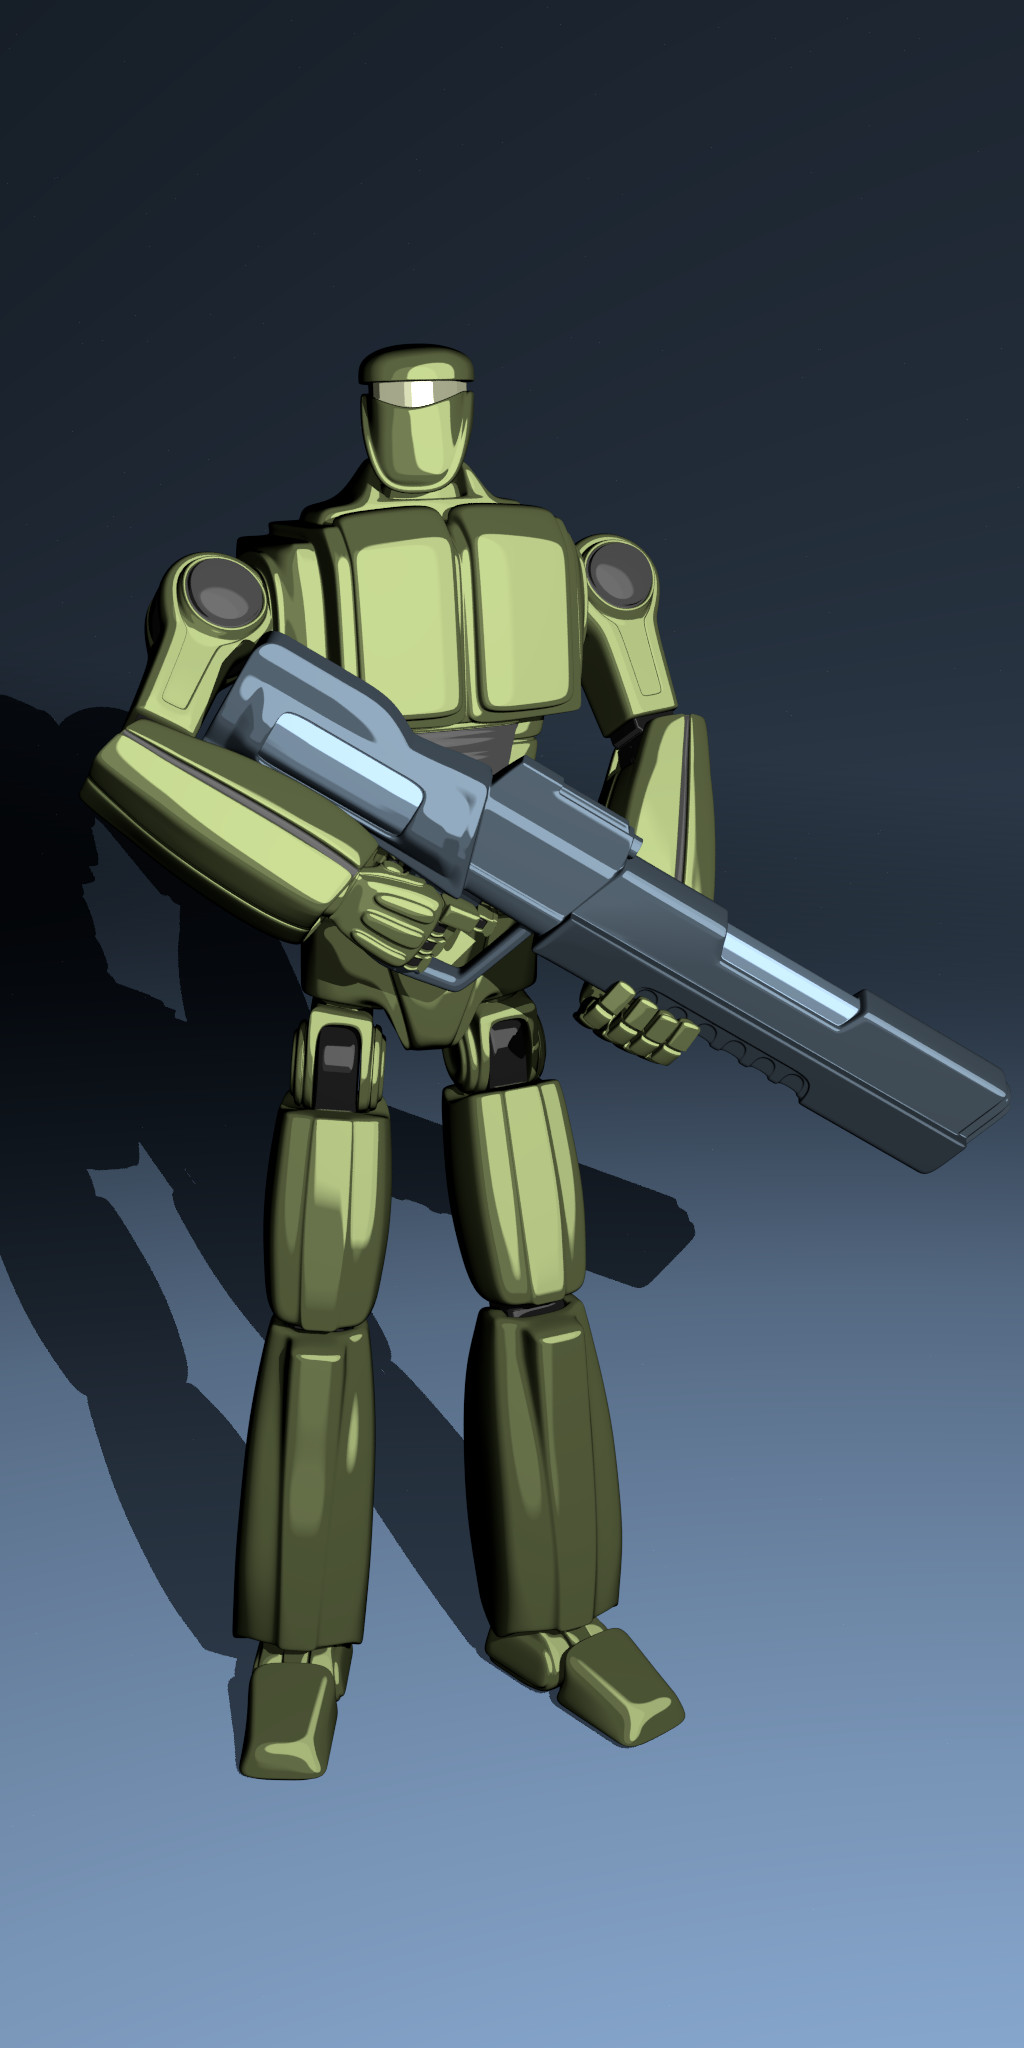
Next step is adding the glossy element. As counterintuitive as it may seem, this time we are going to use another toon shader in diffuse mode. As it turns out, setting smooth value to 0 will create a very sharp terminator with no transition between light and shadow, creating a glossy look. In certain cases such as this one, a toon shader in diffuse mode with smooth set to 0 will give us a better result than a toon shader in glossy mode. In order to get more subtle details in certain areas, we will use the same color we used for the diffuse element, tuned down to 80% by a HSV node. Also, instead of combining our diffuse and glossy elements with a mix shader node, driven by a layer weight node, we will simply use an Add Shader node:
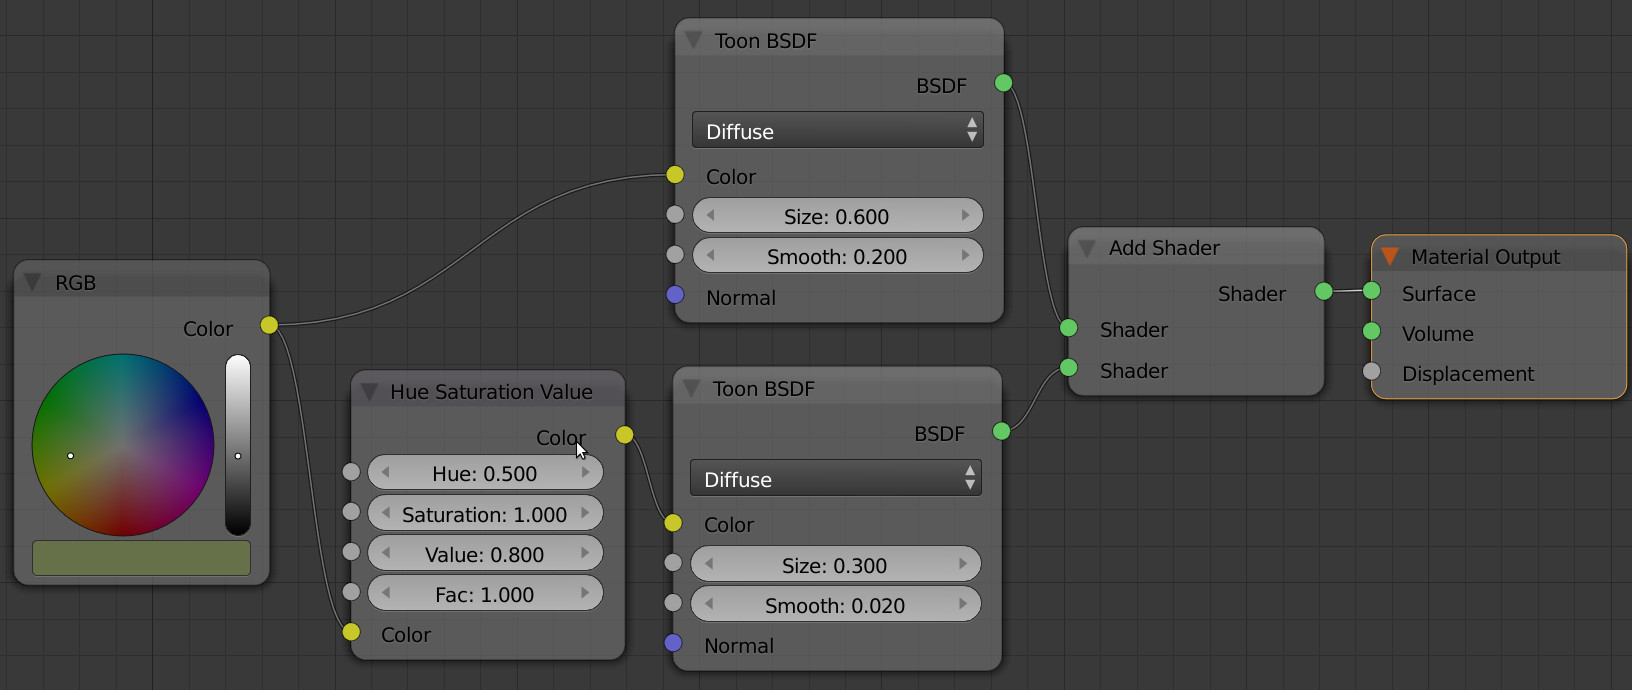
Material node setup – Step 2

Material appearance – Step 2
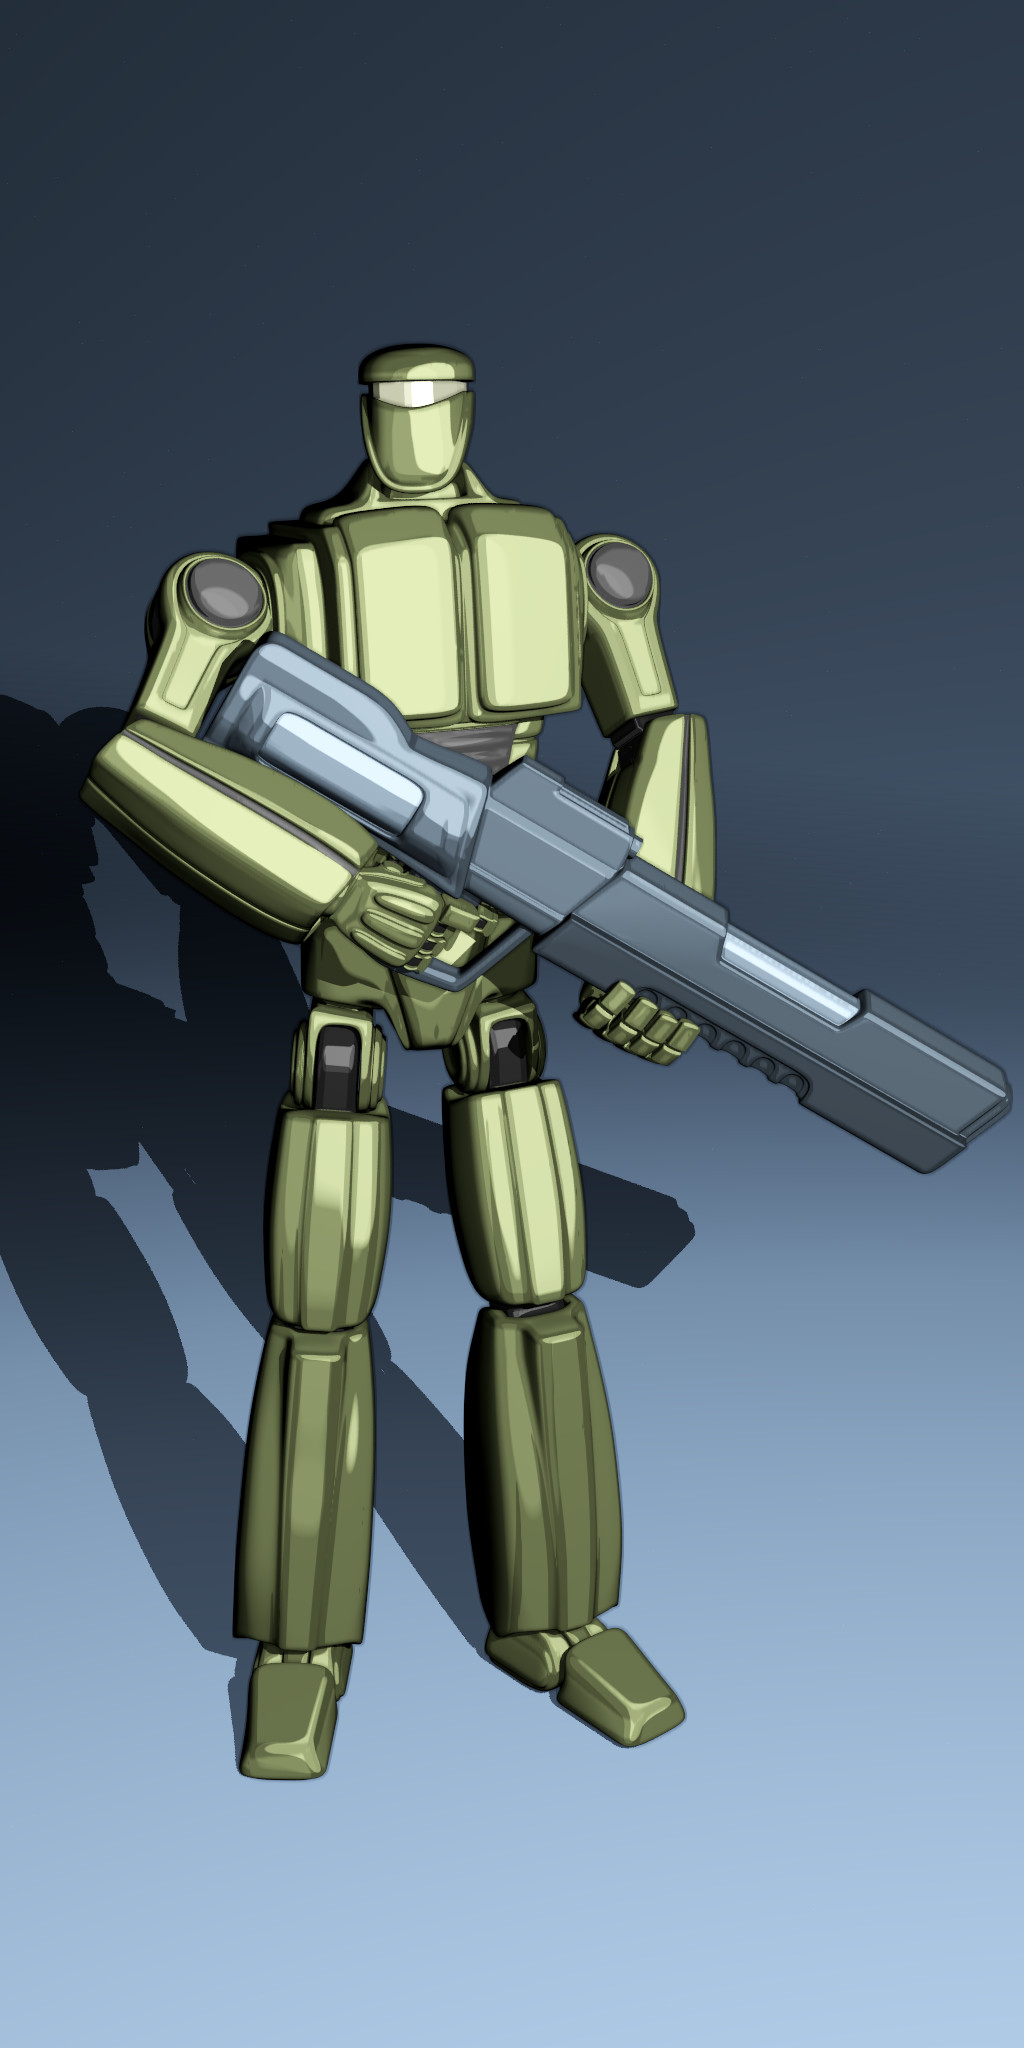
To get a more detailed look, we can assign different variations of this material setup to parts of our model. The aspect of the model before proceeding to final rendering and compositing is this:
Scene with all materials before compositing stage
Render parameters:
Before reaching the compositing stage, we must set the render settings for the scene.
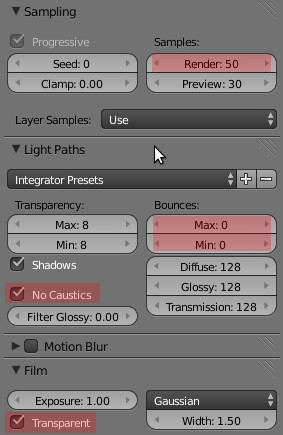
Render settings
Light paths: Forget physically correctness our unbiased rendering. We are doing a cartoon style render here, so we don’t need light bouncing around. Set min and max bounces to 0 and disable caustics.
Sampling: 0 rebounds and hard lights mean that noise will be low to pretty much nonexistent very soon. Usually 50 samples should be enough to have a clean render. You could use even less sampling and probably there wouldn’t be much of a difference to your naked eye, but edge filter nodes in the compositor will notice the difference and return a lot of noise along with the edges we need for our contours. Besides, this technique renders blazing fast already, so there isn’t much of a benefit for lower sampling.
Film: We are going to break up our scene into ‘background’ and ‘foreground’ renderlayers, so in order to be able composite them we will need to enable transparent film.
As I said above, before going into the compositing stage, we must create two renderlayers: Foreground and Background. This is necessary for a correct edge detection, and can even help us to speed our render (more on that in the background renderlayer paragraph). It will also allow us to set different contour intensities for background and foreground elements.
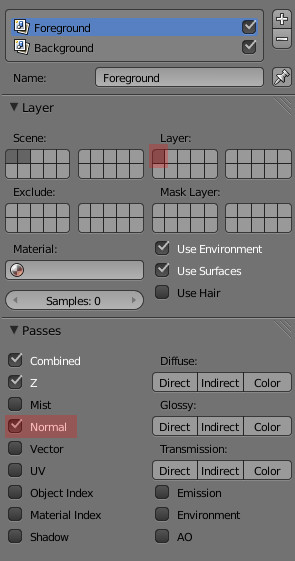
Foreground renderlayer: This renderlayer will have all objects in the scene, excluding background elements such as floors, walls, ceilings, landscapes or terrains. We must always enable normal pass in this renderlayer, as it is necessary for edge detection in the compositor. As you can see in the screenshot below, this renderlayer only includes the first layer, where we have placed everything but the floor.
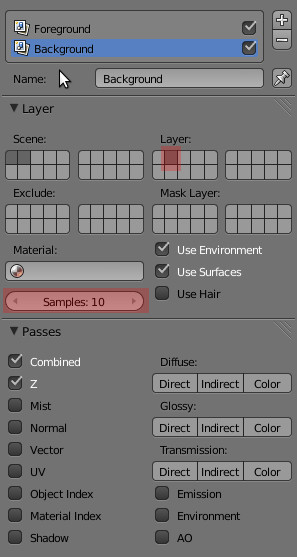
Background renderlayer: This Renderlayer is for background elements such as floors, walls, ceilings, landscapes or terrains. Notice in the screenshot below that we have selected for this renderlayer only the second layer, where we have placed the floor. We will enable normal pass in this renderlayer only in those cases where we want to have countours drawn for the background. Also, in many cases with rather simple backgrounds, like the one in this scene, we can set a much lower sampling just for this renderlayer, thus speeding up our render. This can be done by adjusting the ‘Samples’ indicator in the screenshot below. If we leave the default value of 0, this renderlayer will be rendered using the same amount of samples as the rest of the scene.
Compositing:
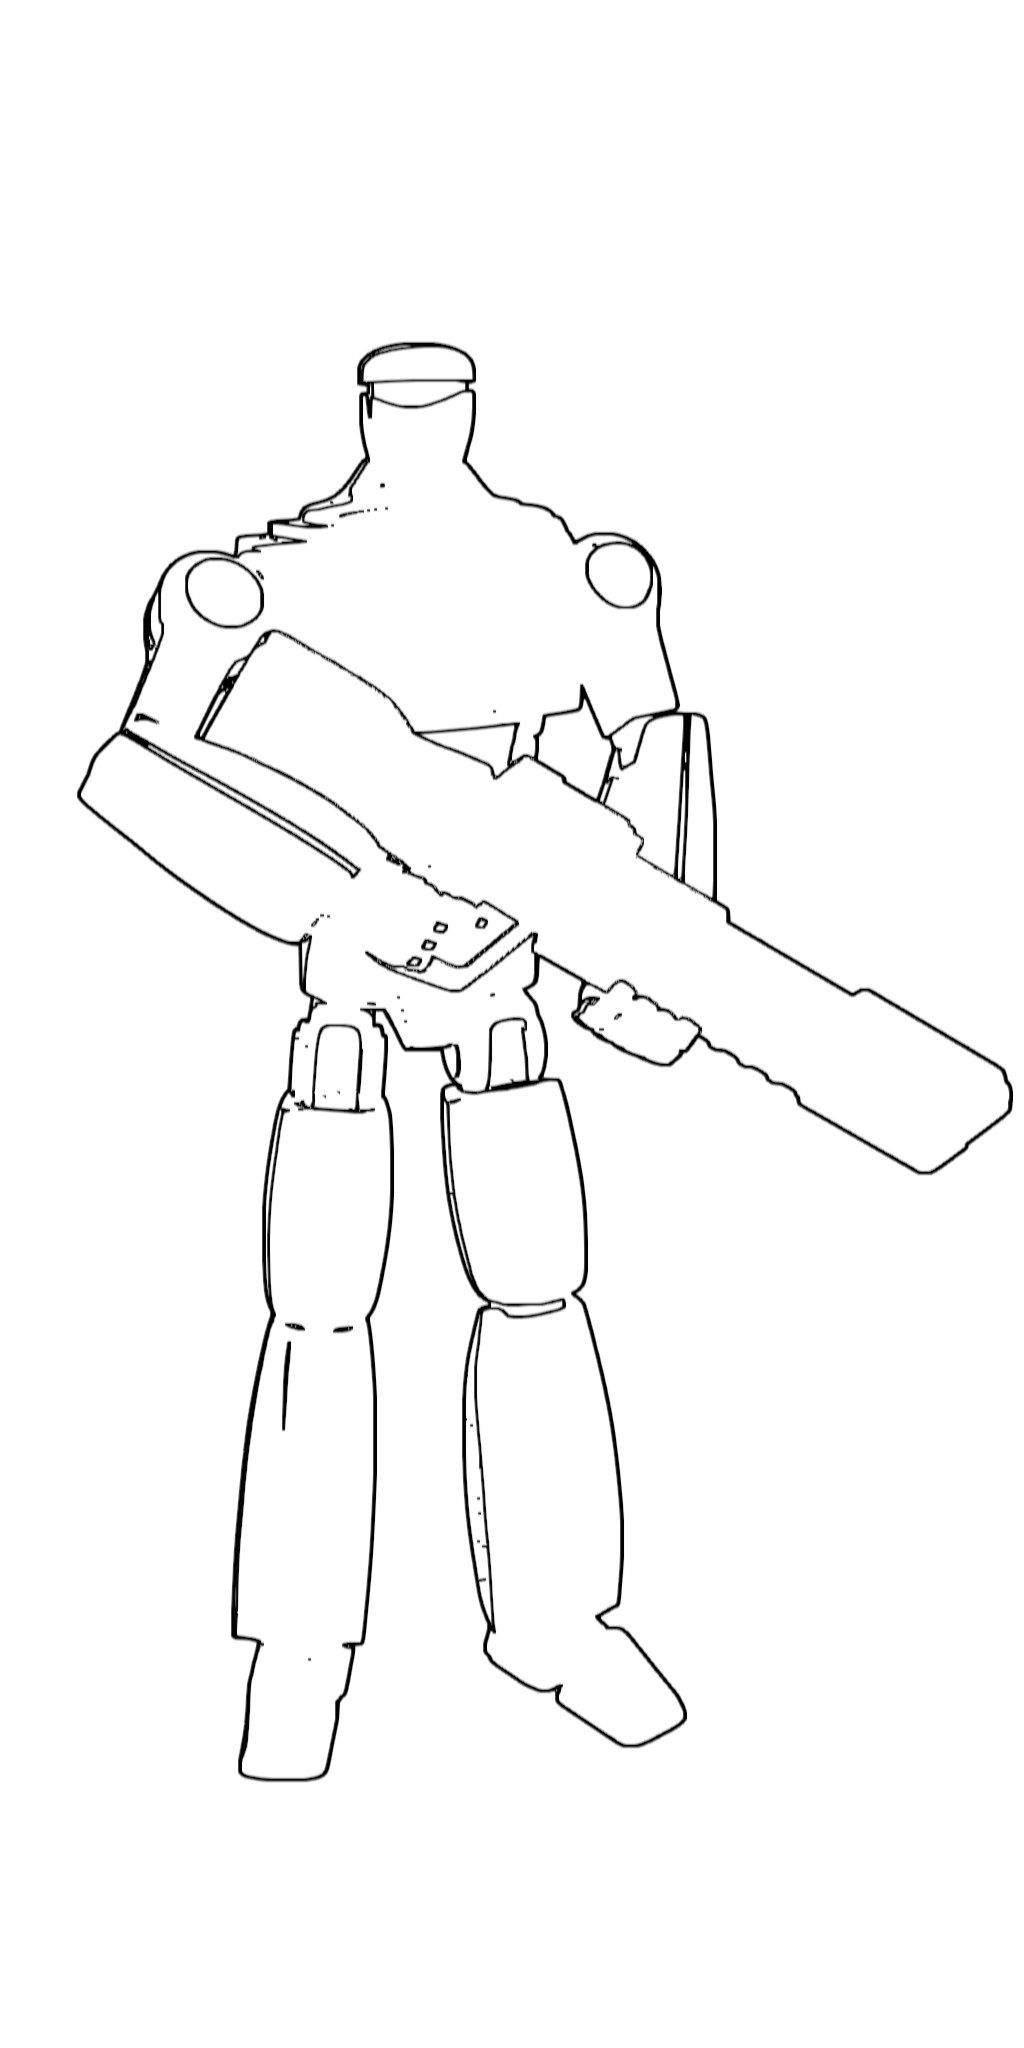
We can now hit render and begin compositing. This is the node configuration we will setup in the compositor to create our contours:
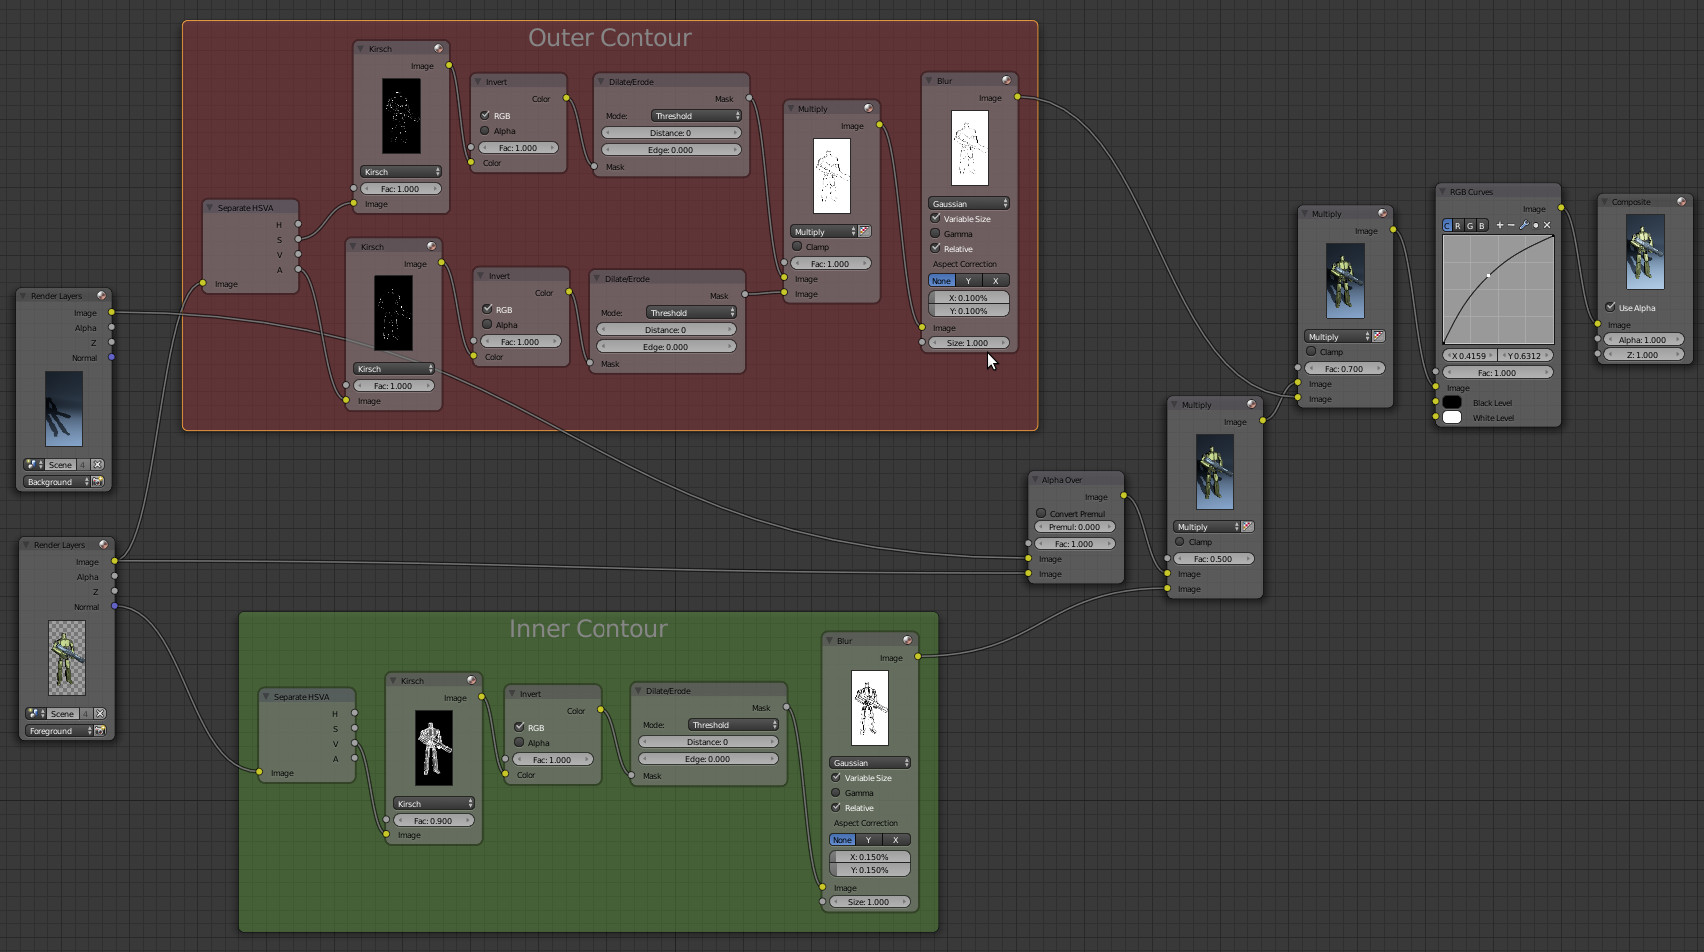
As you can see we start by extracting the inner and outer contours from the foreground renderlayer. We are not going to extract contour from our background renderlayer in this example because the floor is a simple plane. Once we have our contours extracted, we composite together background an foreground and then multiply the result by inner and outer contours in independent steps, so we can use different intensities for both contours.
Inner Contour: this is where the normal pass comes into play. We will first split the Normal output in the Foreground renderlayer into its HSV components and filter its V (for Value) outupt using an edge detection filter. In this case we will use Kirsch, but in certain cases Prewitt and Sobel will work too. The resulting image can show some noise in areas where the source render is darker, which can be solved by decreasing the factor in the filter. After that we will invert the colors to get black edges over a white background, apply a Dilate/Erode Filter to make the edges more homogeneous and Gaussian Blur for some antialiasing. If you are not sure if you are going to make resolution changes in the future, setting relative values for the Gaussian blur is the sensible thing to do, since that mode gives the most consitent output across resolutions, thus minimizing tuture tweaking. Finally, when we apply this contour multplying our render with it, we will use only a 0.4 factor, which will give as a result a subtle contour that integrates better into the image.
Extracted inner contour
Inner contour applied to render
Outer contour: Using the same basic method we used for get the inner contour, we will perform edge extractions based on the S (for Saturation) and A (for Alpha) components of the image output of the Foreground renderlayer and mulptiply them together before applying a gaussian blur filter to soften the resulting contour. This will allow us to have a more clear and regular contour, which is another good reason to split background and foreground elements into separate renderlayers. Having already composited the inner contour into our render, we will multiply the previous step with this contour, but this time will use a higher factor in order to highlight outer contour over the inner contour.
Extracted outer contour

Outer contour applied
Final considerations:
Cycles has been criticized often because of its render speeds and hardware requirements, but this 2048×1024 render takes a mere 26,69 seconds to render on an I7-2600K (Quadcore CPU at 3.4Ghz with hyperthreading). Another common misconception is that being a pathtracer, unbiased physically correct renders are its only objective, however Cycles has a large bag of tricks and tools for non photo realistic rendering, such as lights that don’t cast shadows, ray visibility settings for all lights and objects, negative lights that absorb light from the scene, light path nodes… and now a toon shader. The bottom line is this: although still in development, Cycles is already a versatile render engine, and its possibilities have not been totally exploited yet. Its future certainly couldn’t look any brighter.[:es]Una de las novedades más recientes en el motor de renderizado Cycles es el sombreador toon o dibujo animado. Aunque hay muchas personas interesadas en utilizarlo, no hay mucha información acerca de él aparte de los enlaces aquí mostrados, así que la mayoría se ven avocados a largos y extenuantes procesos de experimentación personal. El objetivo de este tutorial es enseñar al lector a utilizar este nuevo sombreador para crear renderizados con aspecto de cómic, y lo hará basándose en esta sencilla escena como ejemplo:
Este tutorial está dividido en cuatro apartados diferentes:
- Iluminación
- Sombreado
- Parámetros de renderizado
- Composición
Iluminación:
El primer paso será establece la iluminación de la escena, que consistirá básicamente en una luz principal o clave y una luz de relleno. Ambas luces serán lámparas punto con tamaño 0. Cualquier luz con un tamaño diferente a cero creará gradientes en el sombreado. Es necesario un sombreado lo más plano posible, puesto que los gradientes se crearán y se controlarán manualmente utilizando los parámetros ‘size’ y ‘smooth’ (tamaño y suave) del sombreador.
Luz Principal: Consiste en una lámpara punto, ubicada ligeramente por encima y a la derecha del modelo, y con una muy alta intensidad. Esta será la luz principal, la que definirá la dirección del sombreado y la única que proyectará sombras en la escena. La alta intensidad mostrada en los parámetros más abajo es debida a la altura del modelo (10 unidades blender). Modelos más pequeños requerirán normalmente intensidades más ordinarias.
Ubicación de luz principal
Parámetros de la luz principal
Escena iluminada por la luz principal
Luz de relleno: Consiste en esta escena en una lámpara punto, ubicada tras la cámara y cuya ubicación estará en todo momento asociada a la de ésta. Esta lámpara tendrá la proyección de sombras desactivada para evitar que se cree un segundo juego de sombras en la escena, y su función será rellenar las áreas en sombra de los objetos para que no queden en negro absoluto. También creará detalles y destellos adicionales en los objetos. De nuevo el alto valor de intensidad es debido a la estatura del modelo a iluminar.
Ubicación de luz de relleno
Parámetros de la luz de relleno
Escena iluminada por luz principal y de relleno
Fondo: normalmente no utilizaremos el fondo para iluminar la escena, pero en algunos casos se podría utilizar un fondo gris al 25%. Puede ayudar a las áreas en sombra, pero también puede introducir algo de ruido en la escena, lo que requerirá un mayor número de muestras para llegar a una imagen limpia, resultando de esa manera en mayores tiempos de renderizado. Para esta escena en particular no se utilizará el fondo como fuente de iluminación.
Sombreado:
En esta fase se crearán los materiales que definirán el aspecto del modelo. Puesto que todos los materiales de esta escena utilizarán el sombreador Toon, se hace necesario explicar ciertos aspectos del comportamiento de este sombreador.
En primer lugar, es obligatorio utilizar siempre el sombreado suave. De otra forma, aparecerán artefactos indeseados:
Otra aspecto a tener en cuenta al trabajar con el sombreador toon es el hecho de que ciertas combinaciones de los parámetros ‘size’ y ‘smooth’ del sombreador producirán artefactos de terminador claramente visible en los objetos de bajo recuento de polígonos.
Este sombreador puede funcionar en modo difuso o modo reflectivo, y las combinaciones que provocan artefactos en uno de ellos, puedo no provocarlos en el otro. Tras algo de experimentación he descubierto que cumpliendo las dos siguientes reglas para los modos difuso y reflectivo respectivamente, se pueden evitar los artefactos de terminador:
- Modo difuso: size+smooth <= 0.9
- Modo reflectivo: size+smooth <= 1.0
Mientras la suma de valores de ‘size’ y ‘smooth’ no supere 0.9 en modo difuso o 1.0 en modo reflectivo, estos artefactos no aparecerán.
Una vez tenidos los puntos anteriores en consideración, se procederá a configurar los nodos del material principal del robot. El primer paso será establecer el sombreado difuso de base. ‘Size’ (tamaño) permite definir la proporción entre el área iluminada y el área en sombra de un objeto, mientras que ‘Smooth’ (suavizado) permite definir el tamaño del área del terminador. El terminador es el área limítrofe que separa en un objeto el área en sombra del área iluminada. El componente difuso del material se configurará con un tamaño de 0.6, haciendo que la mayor parte del objeto aparezca iluminada, y un suavizado de 0.2 que proporcionará una bonita transición hacia la sombra.
Configuración de Nodos – Paso 1
Aspecto de material – Paso 1
El siguiente paso será añadir el elemento reflectivo. Aunque pueda parecer antiintuitivo, en lugar de un sombreador en modo reflectivo, se añadirá uno en modo difuso. Un suavizado 0 creará un terminador finísimo, sin transición entre la luz y sombra, proporcionando una apariencia de brillo reflectivo. En algunos casos como este, el sombreador toon en modo difuso con 0 suavizado dará mejores resultados que en el modo reflectivo. Para conseguir destellos con más variedad de detalle en ciertas áreas, se utilizará para este componente el mismo color que el anterior, pero disminuyendo su valor a un 80% mediante un nodo de Tono/Saturación. Finalmente, se combinarán los elementos difuso y reflectivo del material mediante un nodo de suma de sombreadores:
Configuración de Nodos – Paso 2
Aspecto de material – Paso 2
Para conseguir un aspecto más de tallado, se pueden asignar variaciones de este material con diferentes colores a partes del modelo. El modelo se vería de esta forma antes de proceder al renderizado y composición finales:
Escena con todos los materiales antes de la fase de composición
Parámetros de renderizado:
A continuación se establecerán los parámetros de renderizado, así como la estructura de capas de renderizado para la escena.
Parámetros de renderizado
Trayectorias de Luz (‘Light Paths’): la corrección física o el renderizado imparcial no tienen importancia alguna para esta escena. Esto se trata de un renderizado con estilo de dibujo, por lo que no es necesaria la simulación de luz rebotada. El número mínimo y máximo de rebotes se debe establecer a 0 y las cáusticas se deben desactivar.
Muestreo (‘Sampling’): Debido a la ausencia de rebotes y la presencia de luces duras, el ruido se disipará bastante pronto durante el proceso de renderizado. Normalmente 50 muestras deberían ser suficientes para obtener una imagen libre de ruido. Posiblemente podrían utilizarse menos muestras sin que el ojo desnudo lo notase en el renderizado final, pero el filtro de bordes del compositor notará la diferencia y devolverá mucho ruido junto con los bordes necesarios para los contornos. Además, con esta técnica el renderizado ya se genera normalmente a gran velocidad, por lo que no hay mucho que ganar reduciendo aun más el muestreo.
Película (‘Film’): La escena se devidirá en dos capas de renderizado diferentes, por lo que para poder componerlas será necesario activar la transparencia de la película.
Como se ha mencionado más arriba, antes de pasar a la fase de composición se deben crear dos capas de renderizado: ‘Foreground’ (Primer plano) y ‘Background’ (Fondo). Esto es necesario para la correcta detección de bordes e incluso puede ser útil para disminuir los tiempos de renderizado (más sobre esto en el apartado de la capa ‘Background’). Esta división también permitirá definir diferentes intensidades para los contornos de los elementos de fondo y de primer plano.
Capa de renderizado ‘Foreground’: En esta capa estarán incluidas todas las capas de los objetos de la escena, excluyendo los que conformen el fondo, como suelos, techos y paredes o terrenos y paisajes. Esta capa siempre deberá tener activado el pase normal, ya que será necesario para la detección de bordes en el compositor. Como se puede ver en la captura de debajo, esta capa de renderizado sólo incluye la primera capa, a la que se han asignando todos los objetos de la escena excepto el suelo.
Capa de renderizado ‘Background’: esta capa es para elementos de fondo como suelos, techos y paredes o terrenos y paisajes. Como se puede ver en la captura de debajo, esta capa de renderizado contiene únicamente la segunda capa, donde se ha ubicado el suelo. Sólo es necesario activar el pase normal en esta capa de renderizado en aquellos casos en los que se deseen contornos para los elementos de fondo también. También, en casos con fondos sencillos como el de esta escena se puede asignar una cantidad menor de muestrar, acelerando de esta manera el proceso de renderizado. Si por el contrario, se deja el número de muestras por defecto, 0, esta capa se renderizará utilizando el número de muestras seleccionado para toda la escena.
Composición:
Llegados a este punto ya es posible renderizar la escena y comenzar a realizar la composición sobre ella. Esta es la configuración de nodos de compositor que creará los contornos:
Como puede verse en la captura de pantalla de encima, se comienza extrayendo los contornos interno y externo de la capa ‘Foreground’. Con los contorno extraídos, componemos el fondo y el primer plano y los multiplicamos por los contornos interior y exterior en pasos independientes con el fin de asignarles diferentes intensidades. En este caso no vamos a extraer contornos del fondo porque se trata de un simple plano.
Contorno interior: Es aquí donde el pase normal juega su papel. La salida del pase normal de la capa ‘Foreground’ se descompone mediante un nodo Tono/Saturación y a continuación se filtra su componente V (de Valor) con un filtro de detección de bordes. En este caso se utilizará Kirsch, aunque en otros casos Prewitt y Sobel funcionarán también. La imagen resultante puede contener ruido donde el renderizado de origen es más oscuro, lo cual puede ser solucionado disminuyendo el factor del filtro. Tras esto, se invierten los colores para obtener bordes negros sobre un fondo blanco, se aplica un filtro Dilatar/Erosionar para hacer los bordes más homogéneos y un desenfoque gaussiano para suavizarlos. En caso de no estar seguro sobre futuros cambios de resolución, es preferible utilizar el modo relativo en el filtro gaussiano en lugar del modo absoluto, puesto que el modo relativo ofrece unos resultados más consistentes en diferentes resoluciones, minimizando de esta forma la necesidad de futuros ajustes. Finalmente se aplica el contorno sobre la imagen multiplicándolo por ella, aunque sólo con un factor de 0.4, lo que dará como resultado un contorno sutil que se integra fácilmente en la imagen.
Contorno interior extraído
Contorno interior aplicado al renderizado
Contorno exterior: Utilizando el mismo método básico con el que se ha obtenido el contorno interior, se realizará la extracción de bordes basándose en los componentes S (de Saturación) y A (de Alfa) de la salida de imagen de la capa Foreground y se multiplicarán juntos antes de aplicar un filtrado gaussiano para suavizar el contorno resultante. Esto producirá un contorno más claro y consistente, lo cual es otro buen motivo para la separación de elementos de primer plano y de fondo en diferentes capas de renderizado. Habiendo ya compuesto el contorno interior en el renderizado, se multiplicará el paso anterior por el contorno exterior, pero esta vez utilizando un factor más alto que dará como resultado un contorno exterior que destacará sobre el contorno interior.
Contorno exterior extraído
Contorno exterior aplicado
Consideraciones finales:
Cycles ha sido a menudo criticado por su velocidad de renderizado y sus requisitos de hardware, pero este renderizado de 2048×1024 sólo tarda en generarse unos meros 26,69 segundos en un I7-2600K (CPU con cuatro núcleos a 3,4 Ghz e Hyperthreading). Otra idea equivocada es que siendo un motor basado en pathtracing, los renderizados físicamente correctos e imparciales son su único objetivo, sin embargo Cycles dispone de una cantidad notable de trucos y herramientas para el renderizado no fotorrealista, como luces que no emiten sombras, ajustes de visibilidad de haces para todas las luces y objetos, luces negativas que absorben luz de la escena, nodos de trayectoria de luz… y ahora un sombreador de dibujos animados. El resultado final es este: aunque todavía en desarrollo, Cycles es ya un motor de renderizado versátil y sus posibilidades no han sido aún explotadas del todo. Su futuro ciertamente no podría ser más brillante.[:]
Very elegant, thoughtful tutorial, JuanJose. Thank you for taking the time to make a HTML page vs a video: this I can refer to and do searches on and go back and forth much more easily.
Interestingly, I have developed a need for just such a shader, so this is very timely! 🙂
Glad you will use this. Just drop me a line when you start having results. I’m very eager to see what others can do with this technique. As for the text tutorial form, like you I find text tutorials more useful and flexible than video tutorials. That and the fact that I don’t like recording myself. 😀
Text tutorials, yes! Agreed. Thank you.
This is a total surprise to me, right after that the Blender Foundation released the long-awaited Freestyle for Blender Internal (which I haven’t even tried yet), but I’m modeling a large building, futuristic in the spirit of e.g. Vincent Callebaut http://vincent.callebaut.org/projets-groupe-tout.html so, yes, I’m fascinated by what you are showing us.
If you look at any of Callebaut’s projects, you will see some quasi-realistic renderings of the intended finished product, followed up by cutaways and draftsman-style images, which are all made (I assume) with the help of archiviz-oriented software (presumably expensive), but I’m married to Blender, so let me ask you:
1.- Edge detection via the compositor is a new concept to me, but it could allow drafstman-style rendering of architectural glass, long before Cycles receives any “Toon Glass” shader, right?
2.- Have you compared the usability of Freestyle versus the Cycles+Compositor technique that you describe?
Hi, Telos. Glad you like text tutorials. 🙂 The designs in the link you have provided are certainly mesmerizing.
As for your questions:
1.- I want to do some experimentation to find ways of showing certain transparent and semi-transparent materials in toon style. I will write a post with my findings when I’m done.
2.- I’ve done a few tests. Unfortunately, the workflow is not exactly ideal. You are forced to create a copy of your scene and adapt it to BI, applying a single shadeless white material to everything. Once you render both original and copied scene, you still have to composite them together, and Freestyle takes its sweet time on scenes with a high polygon count. Compositor edges are lightning fast even on high resolution renders with a high polygon count and don’t require a copy of my scene adapted to BI, that’s why I used them instead of freestyle. I wish developers worked on direct integration between Freestyle and Cycles. That would be an interesting thing to try.
¡Gracias!
Seguiremos atentos. ^_^
Thank you!
You led me by that line of thought, to an idea that could
turn out convenient for architectural visualization:
Say you’re modeling a building, and you’re planning to show it
both in realistic form and in draftsman mode.
Hence, when assigning materials to said building,
rather than suffering to choose between Toon and non-Toon,
choose BOTH, and feed the two into a Mix node.
Connect the non-Toon to the upper input socket
and the Toon to the lower, and in the Fac field
right-click and select Add Driver.
Blender now expects you to type a Python expression
into the Fac field, and I suggest that you type the name of
a Custom Property that you have defined for the whole scene,
to wit:
As explained in http://wiki.blender.org/index.php/Doc:2.6/Manual/Extensions/Python/Properties
there are two Python ways to refer to the value of ArchiDraft:
one, is via a call to get(«ArchiDraft», default)
which would force a dictionary lookup for every pixel rendered(!);
the other says
which leaves the efficiency freak inside me
a lot more satisfied, at least conceptually.
The complication with that,
is that you then have to add the following
in the Text Editor panel, give it a name
(e.g. ArchiDraftActivate) and Run it:
Forever after, you will have to Run those two lines of code
in order for the ArchiDraft property (conceptually: a Scene-scope variable)
to take effect (i.e. enable it to take on a value other than zero).
The scheme works —hats off to the Blender developers—
except that, at least in BF2.67r57600, two bugs kept pestering:One, is the fact that if I add a PyDriver directly into the Fac field
of the Mix node, and then look for it in the Graph Editor,
it is not there, and, even though the field turns purple and
(by hovering the cursor over the field)
one can see that the intended expression is indeed present,
Blender simply refuses to evaluate the expression.
That bug has a workaround:
bring in a Value node, plug it into the Fac field of the Mix node,
and plop the PyDriver expression into the Value node.
The Graph Editor acknowledges; I bear witness. Good. But:
Bug #2: the expression does not update automatically;
it needs to be coaxed and cajoled!
Ok; I post this, rush over to the bugtracker, etc.
¡Paciencia!
P.S. How does one add pictures to these comments??
Tom, this sounds very interesting and useful for a variety of situations. You should probably start a thread over at blenderartists.org detailing your technique. Your ideas will be a lot more exposed to other users and you will be able to easily complement them with screenshots.
Thank you! My bug report is
Brecht Van Lommel has seen it,
and tells me that we can skip the two-line piece of code
by referring to the ArchiDraft flag thusly:
He assures me that that does NOT trigger a string search for every pixel or sample,
merely when Cycles sets things up to begin rendering. Good.
The bug itself is prominently displayed in this picture:
and is still pending.
How does one post pictures into these comments on minimaexpresion.es?
Gracias por el tuto… Hay alguna forma de integrar freestyle???
Saludos
De nada. No lo he intentado, pero imagino que actualmente la única forma de integrar Freestyle con Cycles será renderizar la escena en BI, con todos un único material blanco sin sombreado y Freestyle activado. Después podrías combinar el resultado con el renderizado de Cycles utilizando el compositor. Para mi gusto es muy complicado y probablemente tarde bastante más en renderizar que el metodo descrito en el tutorial.
Where can I find the Toon shader in blender? It is not in my 2.67a version available ( windows 32 bit ). Do I need to activate something or so?
Hi, Jovlem. Please, check my first answer to Robin for an explanation.
Why can’t I find the toon shader in the cycles shader menu?
Do I need to download a non-trunk version of Blender?
Hi, Robin. Toon shader was committed to trunk in revision r56980 (2.67.1). If you want to try the toon shader before the next Blender official release comes out, you can grab latest buildbot build from here.
Thanks for this tutorial and the great model you made. I am an absolute n00b with Blender and am just starting to learn it. I read somewhere that an accomplished Blender artist saw a piece of Blender artwork that inspired hm to achieve something like it himself no matter how many years of leraning it would take. Your figure here with this type of shading is my goal.
Thanks for the inspiration to persevere and learn.
Thanks to you, Doug. Comments like yours are what make all my efforts worthwhile. Work hard, persevere and be patient and you will achieve your goals.
Hola.
Gracias por el tutorial. Ya tengo deberes para unos dias!!!
Esta Genial!!!
Un saludo.
Gracias a ti por pasarte por aquí. No dudes en consultar cualquier duda que te pueda presentar el tutorial. 🙂
Greetings Juan Jose, just popped in to say this is one of the best text tutorials I’ve come across! Well organized, thorough, and easy to understand. I generally like video tuts, but would certainly enjoy seeing more in this format from you. As I’ve been playing with Blender for a bit over a year, I’ve tried to soak in as much knowledge and inspiration from as many sources as possible. I’ve added you to my favorites and look forward to seeing more from you. Thank you sir and good luck in your endeavours.
Thank you, TBolt. I hope you’ll benefit from this tutorial. I wish you luck too. 🙂
Outer contour: I performed edge extractions based on the Saturation components of the «Diffuse Color» instead the «Image» output of the Foreground renderlayer to have less noise
Interesting. I’ll give that a try. Thanks for the heads up. 🙂
I made lighting setup as you wrote but I cannot achieve such effect like «Scene lighted by key light». Shadows on the robot looks so smooth. Is it a raw render or did you add any nodes or compositing to this? Maybe there is a problem with blender version, I used 2.68. Great tutorial btw 🙂
Hi, Adam. Can you upload your .blend to pasteall? If you do, post the link here and I’ll have a look at it and get back to you with suggestions and comments. 🙂
Here you go:
https://dl.dropboxusercontent.com/u/97791799/chibi_toon.blend
Sorry for the late response, Adam. I’ve been checking your blend file and to get the result you see in the screenshot you mention, you must set smooth to 0 and size to 0.5 in the toon shader. You should set background color to absolute black (if you want color in your background, use light paths so it won’t emit any light). You should also place key light above the character and the fill light right behind the camera. Here is your blend file modified according to my suggestions. I hope this is what you are looking for.
Now it looks much better, very much thank you Juan for your help.
You are welcome, Adam. I’m glad I could be of help to you. Happy blending. 🙂
Gran tutorial, muy interesante. ¿Cómo controlas el grosor del borde? Muchas gracias.
Hola, perdona por la tardanza en responder. Llevo una temporada bastante cargada de trabajo. Para aumentar o reducir el grosor de las líneas, es necesario modificar los parámetros del nodo «dilate/erode». En principio el valor de distancia debería permitirte hacer los bordes más gruesos o más delgados, pero también puedes experimentar con los diferentes modos de este nodo si no estás conforme con el resultado.
Fantastic tutorial! I mainly work in LightWave 3D, but your detailed explanation gives me some good ideas for translating this technique from Blender to LightWave. Thanks for sharing!
Thank you! It would be really awesome if you succeed in translating this technique into Lightwave. If you do, could youpost some renders or maybe a short tutorial? I’d love to add a link to it in my article. 🙂
Pingback: mínima expresión » The Legend of the No Name Project
Pingback: mínima expresión » Legend of the No Name Project
Pingback: Blender La Leyenda del Proyecto sin Nombre
excelente tecnica para lograr ese efecto en Cycles…
gracias .. ya lo tengo a usted como referencia
saludos
Awesome tutorial. Just what I needed for my project. Thanks so much. I’ve learnt a lot today.
Thank you for your feedback. I wish you all the best for your project. 🙂
What does it mean to apply a separate-HSVA node to a normal vector? A vector isn’t a colour. What you are doing is calculating the magnitude of the vector. It would help to say so. Because there is a more direct way of doing it.
Would you care to elaborate on that? Thanks.
Hey
Very nice tutorial. I’m glad you wrote it down instead of making a video. I like the art style and for me the new way to make the outlines of the models instead of using freestyle from blender.
I was wondering if have any idea on how to make cartoony fire and/or smoke
Anything like this
Or
https://m.youtube.com/watch?v=lZW-_eNyCxg
I was trying to use quick smoke but the result isn’t what I was thinking of
This is my result atm http://puu.sh/lOmkV/2143bb8369.jpg
Thanks you in advance
Hola, disculpa, no entendí como extrajiste los nodos del contorno interno y externo :/ espero me puedas echar la mano con eso. Gracias
Hola! I couldn’t resist but send a quick comment to thank you for this fantastic tutorial! I love the step-by-step, detailed, clear, beautifully-illustrated explanations 🙂 You make it a real pleasure to read and to learn! So far it’s the best Blender tutorial I’ve ever seen on the Internet! Muchas muchas gracias!